So you have decided to roll your own authentication system from scratch. You have carefully weighed the pros and cons and have decided rolling your own is the best course of action. You have looked at services like Auth0, AWS Cognito, and Okta and still decided you can do it cheaper/better/faster... right? Wait really? Are you... sure?
The topics covered in this blog post only scratch the surface of what is needed to create a truly secure authentication system. If you are simply learning or building a small application that doesn't require serious security than maybe this is the right option for you. However, if you are dealing with payments, bank accounts, or private user information I'd highly recommend reconsidering using an off the shelf auth solution.
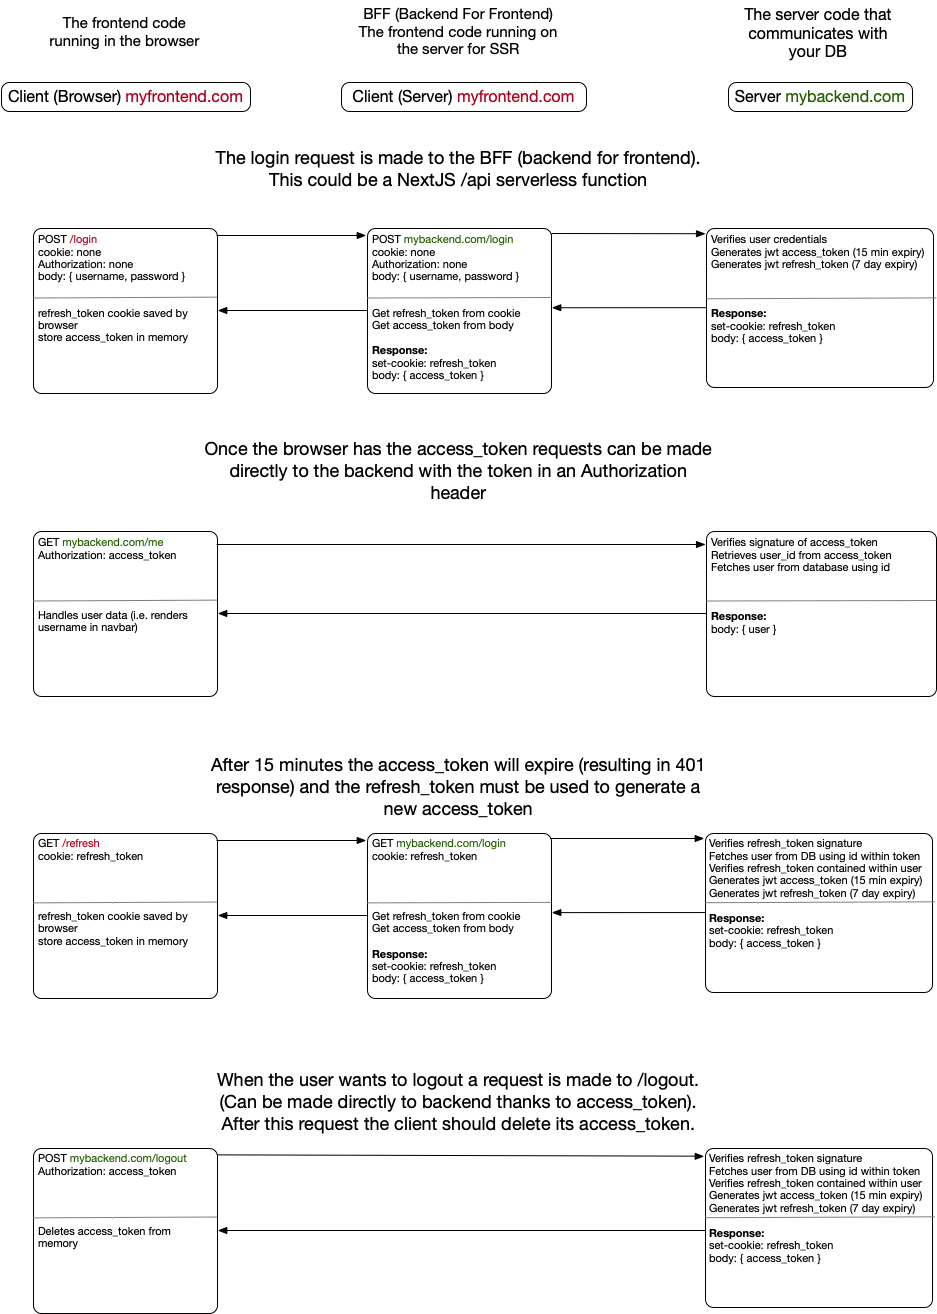
Now that we have that out of the way it seems like you still want to roll your own auth so let's get going. First a quick overview of what how JWT (pronounced jot) token authentication works. In this case we are going to be using a two token flow, an access_token with a 15 minute expiration and a refresh_token used to get new access tokens that never expires.
How JWT Tokens Work
There are many resources that go into this in more detail than I will. Here are a few:
What is a JWT Token
A JWT token is, at its core, a token with a signature that can be used to verify the source of the token. The contents of the token are typically base64 encoded and not encrypted but the included signature allows us to verify we created this token. What this means for authentication is: If we can verify a token with one of our secrets, we can assume the contents and the request made using it can be trusted.
There are attacks where an attacker can either 1.) Gain access to a users access token to make requests and 2.) Gain access to a servers SECRET_KEY to forge tokens.
To solve #1 We can mitigate using an access token with a 15m expiration and refresh token to get new access tokens. I'll go over how in this post.
To solve #2 among many other things we can rotate the keys. This is a bit harder to solve and will not be addressed in this post.
Access Tokens & Refresh Tokens
So in order to keep things secure we need to keep the expiration of the access token short, this will reduce the likelihood that an attacker will gain access to a valid access token and reduce the impact they could have if they did gain access. But what happens when the access token expires? This is where our refresh token comes in to play. We can use the refresh token to ask our server for a new access token. The flow would look like this:
- Client makes login request to
/loginwith credentials. Server responds withaccessTokenin response body andrefreshTokenin httpOnly cookie - Client makes some requests with
accessTokenand it works great! - 15 minutes go by and the access token expires. Requests made with this expired token now fail with 401 errors.
- We make request to
/refreshwith the refresh token (stored in cookie). The server responds with a newaccessTokenin message body and a newrefreshTokenin httpOnly cookie. We can now continue to make requests.
Simple right?!
Things get a bit more complicated unfortunately when we talk about the real world implementation of this. The specific scenario I'd like to cover in this post is a JWT based auth flow with NextJS and an Express API hosted on separate domains.
First a quick overview of the problem:
The Problem
This flow is intended to solve problems that come up when using NextJS to authenticate a backend on a different domain than the frontend. An example would be:
- NextJS hosted on Vercel at
myapp.comor most likelydeployment-321nfdsa.vercel.app - Node/Express API hosted on AWS/Heroku/Provider of your choice at
mybackend.comor some other domain
There is one main problem that surfaces with this sort of deployment and it comes down to Cookies. The most secure way for us to store our session on the client will be a httpOnly Cookie. The issue with this is related to the fact that this cookie won't work across multiple domains. If your frontend is hosted at myapp.com and your backend is hosted at mybackend.com the client won't send your session cookie to mybackend.com and the server side rendering routes at myapp.com. You could set the domain for the cookie, but then this cookie will only be sent to the backend and not to our NextJS API routes or our SSR routes (like getServerSideProps) So how can we store the cookie on the client, include our cookie in requests to our SSR routes, and include our cookie in requests to our backend API?
The Short Answer
Backend For Frontend
A quick summary of the solution before I get in to the nitty gritty details. I've seen this sort of solution called Backend-For-Frontend so that is what I am calling it here. A one sentence summary of the solution would be "Store the JWT token in a httpOnly cookie and proxy requests through NextJS API routes, extracting the token from the cookie before forwarding requests to the backend." An example flow would look like this:
The Longer Answer
OK now lets dive into the code and get this setup. Or you can just look at the github repo: https://github.com/djgould/jwt-bff-auth-example
Backend
Let's define our backend. In these examples I'm using the Serverless Framework and AWS Lamda but this translates easily to Express. We will need to define these routes:
/signupFor creating an account with a username and password/loginFor logging in with username and password/logoutFor logging out/refreshFor retrieving a new Access Token/meFor retrieving information about the user (as an example for an authenticated route)
Generating Tokens
There are two types of JWT tokens you need to create:
- Access Token. Used to make requests on behalf of a user. Any authenticated routes will verify the token in order to establish trust. To improve security this token a short expiration. In our case 15 minutes.
- Refresh tokens. Used when the access token expires to fetch a new one. Has a long or no expiration. In our case I want a user that has been logged out for more than 7 days to have to log back in so I put a 7 day timeout.
I recommend defining helper functions to create these tokens. We are going to use the jsonwebtoken package to create and verify our tokens.
...
import * as jwt from 'jsonwebtoken';
...

const SECRET_KEY = 'mysecretkey';
const generateAccessToken = (user) =>  jwt.sign(
    {id: user.id, access: true },
    SECRET_KEY,
    { expiresIn: '15m' }
);
const generateRefreshToken = (user) => jwt.sign(
    { id: user.id, refresh: true },
    SECRET_KEY,
    { expiresIn: '7d' }
);
Here I've defined the two functions that create the tokens from my user object. Both tokens will contain the user's id.
Signing Up & Logging in
Now that we can generate the tokens we can handle sign up & login. To create the sign up we must hash the user password and then generate the tokens for the user.
# POST /signup

const passwordHash = await bcrypt.hash(password, saltRounds);

try {
const user = await User.save({ username, passwordHash });

const accessToken = generateAccessToken(user);
const refreshToken = generateRefreshToken(user);

await User.update(user, { refreshToken });

return {
  statusCode: 200,
  headers: {
    'Access-Control-Allow-Origin': '*',
    'Access-Control-Allow-Credentials': true,
    'Set-Cookie': cookie.serialize('refreshToken', refreshToken, {
      httpOnly: true,
      maxAge: 60 * 60 * 24 * 7, // 7 days
      sameSite: true,
      path: '/',
    }),
  },
  body: JSON.stringify({ accessToken }),
}
When signing up we need to:
- Create and save the passwordHash
- Generate access and refresh tokens
- Save refresh token for our new user (so we can invalidate it later for logout).
- Send
refreshTokeninSet-Cookieheader and sendaccessTokenin body
Logging in is very similar but instead of creating a new user we will verify the passwordHash with the password the user has used.
# POST /login

const user = await User.findOneOrFail({ username: username });
const passwordMatch = await bcrypt.compare(password, user.passwordHash);

const accessToken = generateAccessToken(user);
const refreshToken = generateRefreshToken(user);

User.update(user.id, { refreshToken });

if (!passwordMatch) throw 'Invalid username/password combination';

return {
  statusCode: 200,
  headers: {
    'Access-Control-Allow-Origin': '*',
    'Access-Control-Allow-Credentials': true,
    'Set-Cookie': cookie.serialize('refreshToken', refreshToken, {
      httpOnly: true,
      maxAge: 60 * 60 * 24 * 7, // 7 days
      sameSite: true,
      path: '/',
    }),
  },
  body: JSON.stringify({ accessToken, user }),
};
Refreshing Tokens
Ok so now you can signup and login and get your access token. But this token only lasts 15 minutes. In order to have a session longer than 15 minutes we need the ability to refresh this token using our refresh token. We can do this with a /refresh route.
This route will:
- Extract the refresh token from the cookie header.
- Verify that this is a valid refresh token
- Confirm that this refresh token is still associated with the user. We do this by checking if it is the same as the refresh token we saved when logging in. If the token is not the same it means the user logged out (you will see later that
/logoutwill delete this token from the user object). - Generate a new accessToken and refreshToken.
- Return the Access Token in the body and the Refresh Token in a Set-Cookie header.
# /refresh

  const { refreshToken } = cookie.parse(event.headers.cookie);
  if (!refreshToken) return ERROR_RESPONSES.INVALID_SESSION;

  try {
    const decoded = await new Promise((resolve, reject) =>
      jwt.verify(
        refreshToken,
        SECRET_KEY,
        async function(err, decoded) { if (err) reject(err); resolve(decoded) })
    );

    const { id, refresh } = decoded as { id: number, refresh?: boolean };

    if (!refresh || !id) return ERROR_RESPONSES.INVALID_SESSION;

    const user = await User.findOneOrFail(id);
    if (user.refreshToken !== refreshToken)
        return ERROR_RESPONSES.INVALID_SESSION;

    const accessToken = generateAccessToken(user);
    const newRefreshToken = generateRefreshToken(user);
    await User.update(user.id, { refreshToken: newRefreshToken });

    delete user.passwordHash;
    delete user.refreshToken;

    return {
      statusCode: 200,
      headers: {
        'Access-Control-Allow-Origin': '*',
        'Access-Control-Allow-Credentials': true,
        'Set-Cookie': cookie.serialize('refreshToken', newRefreshToken, {
          httpOnly: true,
          maxAge: 60 * 60 * 24 * 7, // 7 days
          sameSite: true,
          path: '/',
        }),
      },
      body: JSON.stringify({ accessToken }),
    }
/me and Authenticated Routes
Our routes are now all set up to maintain our session. Time to use this session to authenticate a request and secure the /me route. This is an example of how you can now use your accessToken to authenticate any route:
- We need to get the
Authorizationtoken from the request and check that it is formatted like a valid Bearer token. - We extract the accessToken from the
Authorizationheader and verify it with our SECRET_KEY. - If the verification is successfully we can now trust this request and the user id contained within it.
- We can now perform any action as a user. In this case we simply return the user data from our DB.
const authToken = event.headers['Authorization'];
if (!authToken || !authToken.startsWith('Bearer'))
    return ERROR_RESPONSES.INVALID_TOKEN;

const accessToken = authToken.slice(7).trim();

try {
    const decoded = await new Promise((resolve, reject) =>
      jwt.verify(
        refreshToken,
        SECRET_KEY,
        async function(err, decoded) {
            if (err) reject(err); resolve(decoded)
        })
    );

    const { id, access } = decoded;

    if (!access || !id) return ERROR_RESPONSES.INVALID_TOKEN;

    const user = await User.findOneOrFail(id);

    delete user.passwordHash;
    delete user.refreshToken;

    return {
        statusCode: 200,
        headers: {
            'Access-Control-Allow-Origin': '*',
            'Access-Control-Allow-Credentials': true,
        },
        body: JSON.stringify(user),
    }
} catch (e) {
    return ERROR_RESPONSES.INVALID_TOKEN;
}
Logging Out
The last route we need to create is the /logout route. This route will end the users session by removing the refreshToken for the user from the DB. This will cause future refreshes to fail. The client is expected to delete its accessToken after making a request to the /logout route.
- Get refresh token from cookie
- Verify refresh token
- Update users row and remove refresh token
- Set blank refreshToken cookie that expires immediately
if (!event.headers.cookie) return ERROR_RESPONSES.INVALID_SESSION;

const cookies = cookie.parse(event.headers.cookie);

const { refreshToken } = cookies;

if (!refreshToken) return ERROR_RESPONSES.INVALID_SESSION;

try {
    const decoded = await new Promise((resolve, reject) =>
      jwt.verify(
        refreshToken,
        SECRET_KEY,
        async function(err, decoded) {
            if (err) reject(err);
            resolve(decoded)
        })
     );

    const { id, refresh } = decoded;

    if (!refresh || !id) return ERROR_RESPONSES.INVALID_SESSION;

    await User.update(id, { refreshToken: '' });

    return {
        statusCode: 200,
        headers: {
            'Access-Control-Allow-Origin': '*',
            'Access-Control-Allow-Credentials': true,
            'Set-Cookie': cookie.serialize('refreshToken', '', {
                httpOnly: true,
                expires: new Date(), // expire immediately
                sameSite: true,
                path: '/',
            }),
        },
    }
} catch (e) {
    return ERROR_RESPONSES.INVALID_TOKEN;
}
NextJS Frontend
Ok those are all the routes we should need for now! Let's move on to the NextJS frontend. The goal here is to now build a simple frontend with a basic signup/login form for unauthenticated users. When a user is logged in we will display some user info like the username.
Again if you want to see the whole codebase check out https://github.com/djgould/jwt-bff-auth-example/blob/main/frontend/pages/index.js
I won't break this down into as much detail as the the backend but I will show you the important parts.
There are two important parts to cover:
- The
getServerSidePropsroute which will allow us to server side render authenticated pages and will return the accessToken to the browser - The
pages/apiroutes which will be used to proxy authenticated browser requests to the backend.
getServerSideProps
In my example I am using redux to manage state. You could just as easily return the access token and any other required data directly from this function and then fetch the user from the frontend.
getServerSideProps is run on the server after a request has been made from the browser that matches this page. This means we can access the cookies and headers that the browser passes to this route to forward cookies to our backend. Because the refreshToken is stored in an httpOnly cookie we would not be able to send our cookie to our backend, because it is running on a different domain.
export const getServerSideProps = wrapper.getServerSideProps(async ({
    req,
    res,
    store
}) => {
    // set the default headers for the request
    http.defaults.headers.cookie = req.headers.cookie;
    http.defaults.headers.Authorization = req.headers.Authorization;

    // fetch an accessToken
    const resp = await http.get('/api/refresh');
    res.setHeader('set-cookie', resp.headers['set-cookie']);

    // set default headers that were returned from /api/refresh
    // these include the new accessToken and refreshToken and will
    // be used in fetchUser()
    const respCookie = setCookie.parse(resp.headers['set-cookie'])[0];
    http.defaults.headers.cookie = cookie.serialize(respCookie.name, respCookie.value);
    http.defaults.headers.Authorization = `Bearer ${resp.data.accessToken}`;

    await store.dispatch(fetchUser());
})
pages/api proxies
I'll only show the login example because they are all similar. You could even define a generic catchall that could correctly proxy any request to the backend.
When we login we want to set the refreshToken cookie from the same domain as the client, so it will correctly send this cookie to the getServerSideProps we just defined. In order to do this we must proxy the login through the pages/api/login route. This route will:
- Forward the login request to the backend
- Set the same headers on the response that were returned by the server. This will include the
Set-Cookieheader containing the refreshToken.
import axios from 'axios';
import { NextApiRequest, NextApiResponse } from 'next';

export default async (req: NextApiRequest, res: NextApiResponse) => {
  const { method, headers, body } = req;

  if (method !== 'POST') {
    res.status(404).end();
  }

  try {
    const { data, headers: returnedHeaders } = await axios.post('http://localhost:8080/dev/login', body, { headers });
    Object.keys(returnedHeaders).forEach(key => res.setHeader(key, returnedHeaders[key]));
    res.status(200).json(data);
  } catch (e) {
    const { response } = e;
    const { status, data } = response;
    res.status(status).json(data);
  }
}
This process can be repeated for the logout, refresh, and signup routes as well.
Retrying Failed Requests
The last thing you need to do is handle expired access_tokens by making a call to /refresh when we receive a 401 response
Rather than having to handle this separately with each request we are going to use axios-auth-refresh to automatically make the request to /refresh.
import axios from 'axios';
import createAuthRefreshInterceptor from 'axios-auth-refresh';

const http = axios.create({
  baseURL: 'http://localhost:3000',
  withCredentials: true,
});

createAuthRefreshInterceptor(http, (failedRequest =>
  http.get('/api/refresh').then(resp => {
    const { accessToken } = resp.data;
    const bearer = `Bearer ${accessToken}`;
    failedRequest.response.config.headers.Authorization = bearer;
    return Promise.resolve();
  }))
);

export default http;
And that should be it! Your app should now successfully be maintaining a session!
The End!
I hope you've found this tutorial helpful! This is just the beginning if you are serious about security. This is a good start though to understanding the intricacies of managing cookies and sessions in NextJS.
Thanks for reading!